The prompt
# Recreate a real room in Blender

A reusable prompt for turning a room video, photographs, and measurements into a detailed Blender reconstruction. Replace the bracketed fields with your own information. You can start with the video and provide measurements as you go.

---

I want you to recreate my **[room type: office, studio, living room, etc.]** in Blender using the video and photographs I provide.

The video may move around irregularly, revisit the same areas, and show different objects from different angles. Use those overlapping views to understand how the entire space fits together.

My goal is a measured, editable model with photographic realism. At first glance, a finished render should look like a photograph of this particular room. Match the actual furniture, finishes, flooring, rugs, plants, equipment, and lighting—not just the general style.

## My inputs

- Reference video and photographs: **[attach files or identify the project folder]**
- Room length, width, and ceiling height: **[measurements, or “to follow”]**
- Window, door, and recess measurements: **[measurements, or “to follow”]**
- Furniture measurements or exact product references: **[optional]**
- Presentation: **[exactly as photographed / keep the furnishings and remove temporary clutter]**
- Lighting: **[match the references / describe a different lighting setup]**

## First, research the space

Start with a research pass. Do not begin constructing the room yet.

Extract useful video frames and assemble contact sheets with timestamps. Include wide views of each wall, connecting corners, floor and ceiling views, and closer views of important furniture and materials. Keep the original reference files intact.

Check whether the footage covers the whole room. Tell me specifically what is missing or obscured. Ask for targeted additional photographs when they would resolve a gap; do not automatically request another complete room tour.

Use the overlapping views to establish the layout. Do not force a seamless panorama if camera movement would distort the relationships between nearby furniture and distant walls.

Create an inventory of the room's architecture, furnishings, fixtures, and visible materials. Separate what you can observe from what you are estimating. Do not treat an assumed furniture brand, standard door size, or ceiling tile size as a confirmed measurement.

Account for camera perspective, wide-angle distortion, and exposure differences. If the source is HDR, make consistently converted viewing copies before judging colors and lighting. Do not mistake the camera's processing for the material's true color.

Write a PRD and build plan containing:

1. The intended result and scope.
2. The reference inventory and coverage gaps.
3. Confirmed measurements, estimates, and unresolved questions.
4. The furniture and material inventory.
5. The modeling, lighting, and camera-matching approach.
6. The build stages, review criteria, and final deliverables.

Finish this first phase by showing me the contact sheets, the plan, and the most useful next measurements. Wait for me to start the reconstruction phase.

## Keep measurements consistent

Use one coordinate system and a consistent real-world scale. Preserve my original measurement units alongside any conversions.

Clarify where each measurement starts and ends. Distinguish the main wall face from a window recess, the opening from its trim, and the finished floor from the top of a rug. Do not add the same recess or trim depth twice.

Record unknown values as unknown. A precise-looking number is not useful if it was invented. Use measured geometry and multiple reference views together rather than stretching the room to fit a single photograph.

## When I ask you to build

Create a dedicated Blender project with separate files and checkpoints. If another Blender project is running, use an isolated process and verify the target file before making changes. Do not overwrite, close, or redirect an unrelated session.

Evaluate the available Blender MCP tools and Blender Python workflow. Choose the appropriate control method for each operation; neither replaces careful modeling or visual verification. Check which instance an MCP connection controls before using it.

Build and verify the measured room envelope first: walls, floor, ceiling, openings, recesses, trim, and major furniture positions. Then finish one representative area to establish the required material and lighting quality before applying that approach throughout the room.

The finished scene must include recognizable, detailed objects. Model the features that affect shape and shadows: furniture legs and supports, cushion seams, cabinet gaps, handles, rug edges, window frames, and plant leaves. Use subtle, correctly scaled surface detail for wood grain, fabric, paint, and other finishes.

No final placeholder furniture, swollen cushions, featureless plant blobs, or generic textures that erase the room's identity. Do not hide unfinished modeling behind heavy blur, dramatic grading, or a single favorable camera angle.

Reproduce the observed light sources, their direction, relative brightness, color, and shadow softness. Keep material color separate from colored light falling on it. Use Cycles for the final photographic renders, with quality settings chosen through inspected results rather than an arbitrary sample count.

If I requested a tidied room, record what was removed. Preserve working equipment and plausible cable connections. Do not silently redesign the room or replace its furniture.

## Verify and deliver

Compare renders with reference frames using matched camera angles. Inspect every wall direction and important close-up. Check dimensions, furniture placement, floor contacts, reflections, material scale, and lighting.

Review the actual rendered images, repair visible discrepancies, and reopen the saved project to verify that it works and its assets are available.

Deliver an editable Blender file, dimensioned room drawings, photographic stills from several useful viewpoints, and a brief account of remaining uncertainty. Keep reference comparisons separate from presentation images where deliberate cleanup changes the scene.

Aim for photographic fidelity without claiming that a handheld video establishes exact hidden geometry or guarantees literal pixel-for-pixel identity.

## Handle references privately

Do not publish the project or send private reference media to an additional external service without my instruction. For outputs intended for public sharing, flag visible personal information and use neutral replacements for sensitive screen content, documents, or labels. Keep private reference files separate from the shareable deliverables.

---

**Sharing note:** This template does not require sharing your source footage, exact room measurements, or project files publicly. If you choose to share your own media, review both visible content and embedded metadata, including location information.
The exact prompt GPT-6 Astra received, from the article.
The builds
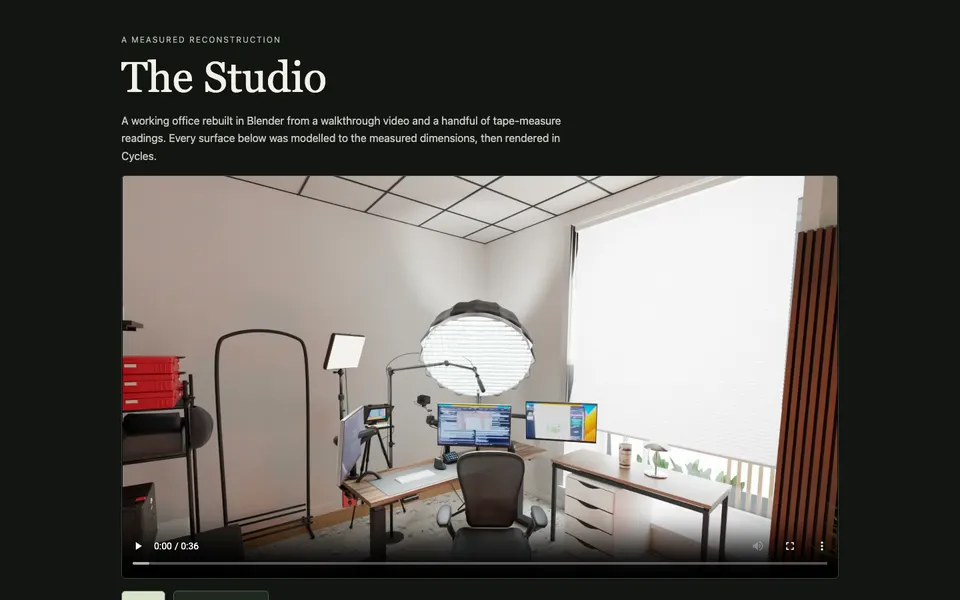
GPT-6 Astra · Screenshot of the buildRuns in your browser
Featured in
I Gave GPT 6 Astra Blender Access (The Results Are INSANE)
This build’s chapter starts at 15:46.

Written by
Pat Simmons. Pat tests AI models and tools on his YouTube channel.