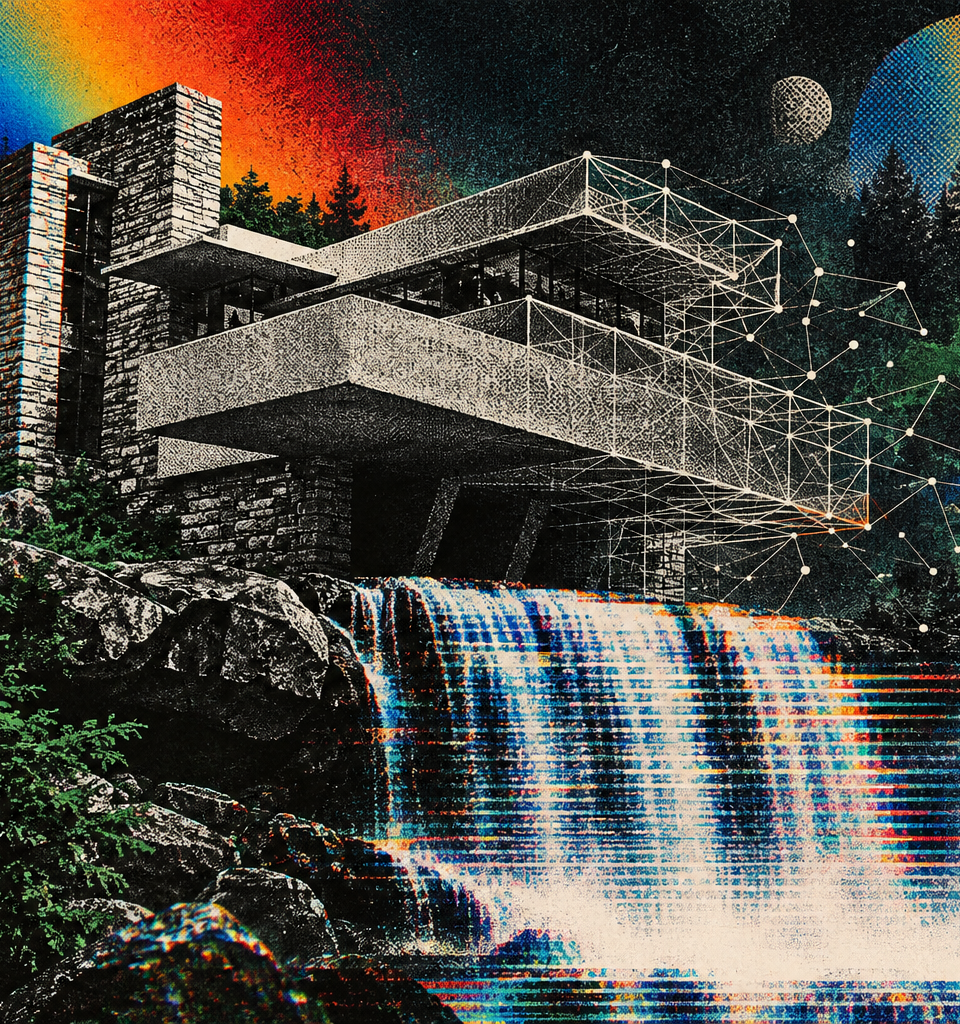
I gave GPT-6 Astra control of Blender, the free 3D modelling software, and asked it to build three things: a flythrough of Frank Lloyd Wright's Fallingwater, the room I am sitting in right now, and a 3D model of the NEO humanoid robot embedded in a web page. You do not need to know how to code or anything about Blender to do this. Neither do I. The setup takes five minutes; the three builds took 54 hours of unattended compute and $1,771.61 in tokens. Below are the prompts, the results, and everything that broke.
Get the skill
The skill below drove Blender for all three builds. Everything else on this page is linked where it comes up: all three prompts are in copyable cards, and the three finished builds are Fallingwater, the studio, and the NEO page.
Get the Blender files
These are the actual .blend files each build produced, with every texture packed inside so they open on their own. They need Blender 5.1 or newer, which is free. The flythrough in the video was driven by a script, so the Fallingwater file gives you the model and its ten saved camera views, not a play button.
Fallingwater is large because the terrain, the water and the stone are all real geometry rather than textures. Give it a minute to open.
How I ran it
The same three-step pattern produced all three builds, and it matters more than the prompts do.
First I riff at Astra in plain language and tell it to research the subject and write a PRD. I do not paste in a finished prompt. Second I read the PRD it writes and check that it contains real terminology, because a build agent following specific direction beats one following "make this realistic". Third I open a new chat with fresh context and give that agent a /goal pointing at the PRD.
I run on Extra High effort rather than Max. Max gets a little crazy.
Astra worked out its own Blender access. It told me Blender was installed and it could drive the Python API directly, that no MCP server was configured, and when I asked which was better it came back recommending a hybrid: the MCP for live inspection and corrections, saved Python scripts for precise repeatable construction. I configured nothing.
I also pointed it at skills.sh and told the research agent to find a well-starred Blender skill rather than starting cold. The skill below is what I ended up with after all three builds.
The Fallingwater prompt
# Fallingwater: faithful, photorealistic, fully explorable Blender reconstruction

**Execution PRD — researched 7 September 2026.** This is the specification for the later build goal. The current preparation phase gathered evidence and tested Blender control; it did not build the house. When the user starts a goal to execute this file, carry the work through to the deliverables and verified acceptance gates below. Do not stop after another plan, an exterior blockout, one attractive render, or a script that merely runs.

## 1. The intended result

Build Frank Lloyd Wright's **Fallingwater in Blender**, including the main house, guest house and staff/service spaces, connecting circulation, terraces, pools, waterfall, rock formations, and surrounding woodland visible during exploration. The user must be able to look around the exterior and freely fly through the different rooms in a coherent, fully modeled scene.

The visual ambition is photographic credibility at first glance from a distance, with carefully observed geometry and materials that hold up at human viewing distances. The house must be recognizably this particular building: its measured proportions, masonry, cantilevers, glazing, intimate rooms, built-in furniture and relationship to Bear Run. No final placeholder shapes, swollen furniture, rounded rock blobs, generic modern interiors, featureless stone walls, or flat blue water.

**User-confirmed setting:** the **restored house with documented furnishings, in lush late summer**. Treat this as a clean conserved presentation informed by the latest verified condition, rather than a claim to reproduce one survey of every detail on an exact day. Retain documented permanent museum-era alterations, including the enclosed former carports. Exclude temporary scaffolding, conservation coverings and transient visitors from the presentation. Record any other presentational omission, such as a movable visitor barrier, so it cannot be mistaken for a measured change.

The project has two equally necessary quality dimensions: **architectural fidelity** and **convincing appearance**. Neither compensates for failure of the other. A beautiful invented room fails; an accurate but visibly crude room also fails.

## 2. Read and use this research before construction

Read these files fully; they are part of this specification. Open the actual drawings and photographs, not just the written summaries.

1. [Architectural evidence, every-space inventory and dimension anchors](research/architecture-agent.md).
2. [Room references, furnishings, materials and source caveats](research/interiors-agent.md).
3. [Blender 5.1 realism methods, navigation, QA and open-source tooling audit](research/blender-realism-agent.md).
4. [Tested Blender MCP/API decision, setup and fallback client](research/blender-control.md).
5. [Research index and known gaps](research/README.md).

The primary geometry archive is already downloaded: **11 main-house HABS sheets and 4 guest-house sheets**, full-resolution TIFFs, readable rotated previews and detail crops under `references/architecture/`. `drawing-downloads.json` is the per-sheet provenance/checksum manifest. Supporting PDFs include survey data, caption lists, the official visitor guide, Avery's drawing inventory and the preservation-scanning paper. The separate interiors directory contains photographs, contact sheets and tour metadata indexed by its manifests.

### Evidence hierarchy

| Question | Use first | Cross-check |
|---|---|---|
| Built geometry, topology, openings and level relationships | LOC HABS PA-5346 (`pa1690`) and PA-5346-A (`pa2187`) plans, sections, elevations and details | Independent elevations, photographs and newer documented interventions |
| Current restored appearance | Dated Fallingwater/WPC preservation and collections material | University and archival photographs with their age/state recorded |
| Furniture, fixtures, joinery and room identity | Official collection/conservation records plus identified room photographs | HABS detail sheets and plan positions |
| Site and waterfall form | HABS relationships/elevations and multiple actual site photographs | Appropriate public elevation data if verified useful; never generic terrain alone |
| Blender behavior | Installed 5.1.2 RNA/API, official versioned manual and actual local tests | Reviewed source of a specifically useful library/add-on |

Original Wright designs at Avery/JSTOR are discovery/corroboration sources, not automatic overrides of the built house. Generic stock assets and generated images are not architectural evidence. When sources disagree, record the specific conflict, dates and chosen interpretation.

### High-impact facts and traps already established

- Main plans are sheets **3–6**, elevations **7–9**, sections **10**, and fireplace/hatch/desk/lamp details **11**. Guest sheets **1–2** give levels, **3–4** elevations/section. See the linked architecture inventory for exact URLs and local files.
- Main sheet 4 labels the living space **48 ft × 33 ft 8 in**, the kitchen **15 ft 9 in × 12 ft**, and the servant's sitting room **11 ft 5 in × 9 ft 4 in**. These are anchors, not instructions to replace irregular outlines with rectangles. [Main first-floor drawing](https://www.loc.gov/resource/hhh.pa1690.sheet/?sp=4).
- Floor/terrace datums and roof surfaces differ. The third-level annotation **+17′-3/4″** means 17 feet plus three quarters of an inch. The guest house has an independent drawing datum; setting both buildings to world Z=0 is wrong. Follow leaders and sections, not one blanket floor-height increment.
- The site sheet explicitly describes the road/path/stream locations as approximate. Do not market the resulting terrain as survey-exact. [Site drawing](https://www.loc.gov/resource/hhh.pa1690.sheet/?sp=2).
- The university reference directory's `2018` name does not establish photo capture dates. Much of its exterior imagery is leaf-off. The tour also contains an unrelated ornate-hall scene ending **`_102`**; exclude it. A maintenance-state panorama with covered furnishings is not a styling reference. Follow the interiors note's exclusions and room mapping.
- Distinguish the **main-house plunge pool** from the **guest-house swimming pool**. The Columbia photos named `0_pool1` and `0_pool2` are not automatic guest-pool evidence.
- Later conservation sources supersede older descriptions where relevant, including the kitchen floor. The World Heritage Preserved blog documents recent work and removal of scaffolding for the 2026 reopening. [Current preservation record](https://fallingwater.org/projects/world-heritage-preservation/).
- Preservation teams created extensive CAD and hundreds of laser scans, but this research did **not** obtain their raw registered scan/CAD data. Public references support a detailed reconstruction, not a truthful promise of every hidden surface being exact. [Primary documentation paper](https://isprs-archives.copernicus.org/articles/XLII-2-W5/389/2017/).

## 3. Scope and room completeness

Expand **every space ID in the architecture note** into `data/rooms.csv` or equivalent before modeling. Each independent bath, staff room, terrace, stair, service space and structural bay needs its own row. Do not turn grouped notation such as `SINGLE-A/B` into one object or one unchecked status.

| Area | Required coverage |
|---|---|
| Main basement/river level | Wine cellar, bath, boiler room, service circulation, three structural bays and rock interfaces; plunge pool and stream access |
| Main first floor | Entry, coats, loggia, living and dining areas, hearth, reading/built-in areas, kitchen, servant's sitting room, service connections, terraces, hatch and hanging stair |
| Main second floor | Master/Liliane suite, dressing/Edgar Sr. suite, guest suite, **three separate baths**, hall/stairs, each terrace and enclosed connecting bridge |
| Main third floor | Study/library, bath, narrow gallery, sleeping alcove, terrace, relevant exterior connections |
| Guest basement | Laundry, bath and connecting stair |
| Guest principal floor | Lounge, guest bedroom, bath, boiler space, chauffeur's lounge, theater/enclosed former-carport area, car court, terrace, pool and steps |
| Guest upper floor | One double staff room, two single staff rooms, shared bath, hall/stairs and terrace |
| Shared exterior | Covered walkway, bridge/drive, all façades and undersides, roofs visible from orbit, waterfall tiers, streambed/banks, major rock ledges, planting and woodland context |

This scope is defined by the source inventory rather than a promotional total “room count.” Dining is part of the open living space; foundation bays are not bedrooms. Room aliases must map to the plan labels. Contemporary use of sparsely documented service areas must remain explicit if unverified.

Each room needs complete enclosing geometry, appropriate openings and circulation, observed finishes, built-ins/furnishings/fixtures where evidenced, and a believable treatment of poorly documented surfaces. Track `plan_sources`, `photo_sources`, `era`, `confidence`, `geometry`, `materials`, `furnishings`, `navigation`, `visual_qa`, and `remaining_defects`. Missing imagery is not permission to omit a room or represent an invented layout as fact.

Research unknowns before constructing the affected element. When further public evidence cannot resolve a detail, use a conservative, internally coherent reconstruction grounded in adjoining evidence and mark it **inferred** in the ledger. Do not stall the whole project indefinitely or claim the unknown has been verified. No outreach to archives, purchases, paid API use or public publishing is included in this goal without user authorization.

## 4. Execution environment and control

Use the tested **Blender 5.1.2** installation and Metal GPU on this **M4 Max / 64 GB** Mac. The current scene tests verified Cycles GPU and EEVEE on a factory cube; they do not establish final-scene frame rate or render cost. Preserve the evidence in `research/preflight/`.

Use the already configured **official Blender Lab MCP** for live scene inspection, small corrections, API lookup and image capture. Keep reusable `bpy` construction scripts as the source of repeatable operations. Official MCP source commit and the necessary **MCP SDK 1.30.0 pin** are documented in `research/blender-control.md`; preserve them. When native tools are unavailable, use `scripts/blender_mcp_client.py`, which was verified against the actual official server.

For full-resolution visual review, save a screenshot or render to a local path and open the image. The official inline screenshot transfer failed in preflight, whereas the path-based method worked. Do not repeatedly call a failing image endpoint or treat its failure as a reason to skip QA.

`scripts/launch_blender.command` starts Blender with the networking mode required by the localhost MCP bridge. Confirm which file is open before any mutation. Save milestone files before risky operations, preserve user edits, and modify only owned collections. Prefer the data API/BMesh for bulk work; provide explicit context for operators. Keep scene mutations on Blender's main thread and through one writer. Independent agents may research, prepare assets or review outputs; they must not race on the same `.blend`.

### Storage and organization

Internal free space was about **19 GiB** at preflight. The mounted `/Volumes/Pat Samsung` had approximately **1.1 TiB available**. Recheck capacity and sustained write behavior before production. Create a dedicated external project directory, proposed as `/Volumes/Pat Samsung/Fallingwater/fallingwater-flythrough_9.7.26/`, for large textures, `.blend` checkpoints, caches, final render sequences and portable delivery. Keep source scripts, research, parameter files, compact QA reports and a `DELIVERY.md` path map in this workspace. Do not delete unrelated files to make room or duplicate huge assets unnecessarily.

Use meaningful collections, for example `SITE`, `MAIN/L01/ARCH`, `MAIN/L01/FURNITURE`, `GUEST/L02`, `WATER`, `VEGETATION`, `LIGHTS`, `CAMERAS_QA`, and `CAMERAS_PRESENTATION`. Keep parameterized base construction distinct from accepted manual refinements, with a deterministic seed and stage ownership. Every hand refinement must be saved and survive rebuilding a different stage.

Keep linked resources relative within the delivery directory. Do not pack all photographic research or an entire third-party library into the production file. Include just the required distributable assets and record their source, version, scale and license. Maintain a dependency manifest and resumable stage logs.

## 5. Geometry and registration requirements

Set **1 Blender unit = 1 metre**, scale 1. Convert feet/inches exactly using 1 ft = 0.3048 m. Establish local origin, north and an explicit elevation datum. Do not use a giant geospatial coordinate as the modeling origin.

Register each plan from multiple dimension/scale-bar anchors and shared masonry corners or stair cores. Original TIFFs and insets can have different orientation/scales; a resized preview's nominal print scale is not valid pixel calibration. Preserve source endpoints, actual pixel coordinates, units, inferred uncertainty and residuals in `data/dimensions.csv`. Separate explicitly dimensioned values from raster estimates.

Trace irregular slabs, recesses, chimney/stone cores, parapets, curved terrace ends, roof edges and glazing. Solve floor, soffit, slab, terrace and stair levels through coordinated sections. Resolve the guest-house offset before committing to the connected walkway. Check stair count/rise/run and headroom against actual evidence; do not enlarge low rooms or narrow passages to accommodate a default avatar.

Build all sides of each room and visible exterior assembly. Include wall/slab thickness, thresholds, window reveals, door frames/leaves, soffits, roofs, terrace undersides, exposed supports, stair voids and drain/roof junctions visible from the allowed camera space. Doors must open in a plausible way or be intentionally posed for access. A door texture on a sealed wall fails.

Model the particular masonry: long irregular horizontal courses, varying projections, recessed mortar, real corners/returns, lintels and stone/steel/wood junctions. Trace distinctive photographed hero stones and hearth contours when visible. A generic repeating brick shader cannot define the stonework. Use physical geometry for silhouette, parallax and cast-shadow details; controlled displacement/bump for smaller relief.

Keep manufactured planes intentional and edges softly bevelled at believable scale. Do not apply broad subdivision to the whole building. Use true mesh bevels where needed in both renderers; a Cycles-only Bevel shader does not solve EEVEE edge appearance. Evaluate and inspect boolean results, normals, joints and thickness; successful modifier evaluation is not a visual pass.

## 6. Interior craft and materials

The interiors note provides the room references and known furniture/finish details. Make an object checklist per room before authoring its furnishings. Reproduce visible furniture proportions, placement, wood grain direction, supports, joinery, edging, upholstery seams/piping, bedding folds, lamp shades/stems, brackets, handles, shelves, books and characteristic objects from those references. Include small details according to visibility, not random clutter density.

| Material / assembly | Required treatment |
|---|---|
| Painted concrete/parged surfaces | Observed warm light-ochre appearance; restrained fine surface relief; credible edge rounding and contact; repaired/restored condition. Avoid pure-white generic concrete or exaggerated dirt/cracks. |
| Masonry and natural rock | Separate cut/laid wall stone from geological ledges; actual course proportions, fractured/stratified forms and local color variation; wetness/moss only where plausible and supported. |
| Flagstone | Irregular joint pattern, actual slab scale and boundary continuity; soft reflected highlights appropriate to the particular finish. Trace key visible seams; no evenly tiled cobblestone substitute. |
| Wood/built-ins | Member-specific grain orientation, plywood/veneer edge logic, joinery, subtle finish variation and dimensional construction. Avoid applying one stretched wood image to every face. |
| Painted steel | Actual thin profiles and meeting details; Cherokee-red appearance calibrated across references. Paint is the visible dielectric layer; don't make it uniformly bare metallic. |
| Glass | Finite thickness and correct normals in the master, framing, joints, reflection and transmission checks at corners and through multiple panes. No empty holes or opaque glossy plates substituting for glass. |
| Textiles | Believable thickness, seams, contact deformation and fine weave/sheens. No inflated smooth boxes. Preserve recognizable patterns only where reference/asset use supports them. |
| Kitchen/baths/service fixtures | Use each room's evidence, correct era and measured fit. Model visible sinks, taps, appliances, sanitary fixtures and cabinetry distinctly; never paste a generic contemporary bathroom into every suite. |

Use physically sized photo-derived PBR assets selectively where they resemble the actual material. [Poly Haven's CC0 assets](https://polyhaven.com/license) are useful raw inputs, not proof that a downloaded stone matches Fallingwater. Keep color images in the correct color space and roughness/normal/height data as Non-Color. Inspect normal orientation, displacement bit depth and physical amplitude. Do not use a photograph containing sunlight/shadows as an uncorrected albedo map.

Distribute detail across shape, roughness, color and contact. High-frequency noise alone does not look like craftsmanship. Control UV density according to closest intended viewing distance; increase hero texture resolution selectively, retain aspect ratio, and do not destructively resize all source images. Use final-output 100% crops to judge whether the detail resolves naturally.

## 7. Water, terrain and late-summer woodland

The ground is a shaped geological site, not a flat plane with scattered spheres. Reconstruct the major rock shelves, waterfall lips and drops, under-house contact, streambed/banks and bridge relationship from multiple views before decorating. The verified PASDA **22001480PAS bare-earth DEM** archive is already downloaded under `references/terrain/` (44.6 MB ZIP; source/CRC/hash manifest alongside). It provides approximately **0.762 m cells** for broader terrain. Its horizontal system is NAD83(2011) Pennsylvania South FIPS 3702 in **US survey feet**, with NAVD88/GEOID12b elevations also in US survey feet. Validate the actual GeoTIFF and transform/register it deliberately: one US survey foot is `1200/3937` metres, distinct from architectural feet. Retain a local modeling origin and solve the relationship to HABS's relative datums. This 2019–2020 aerial terrain cannot establish individual overhangs, waterfall surfaces or current rock microdetail. [Exact source and metadata](research/architecture-agent.md).

Water needs depth, credible edge/shore transitions, flow direction, reflection/transmission, surface structure and aerated impact zones. Shape the falling sheets/filaments to the real ledges and outflow. Use controlled foam and localized spray; avoid a solid white ribbon, uniformly opaque foam, ocean waves in a narrow stream, or a blue mirror across the whole site. Wet rock should have coordinated reflectance/darkening. Match water's photographic appearance to shutter duration; do not model long-exposure blur as solid geometry.

Start with a believable looping interactive water treatment using geometry and flow-aligned animated shading. Test whether a localized fluid simulation improves the needed views before committing to its cache cost. If used, resolve obstacles and physical scale in a small pilot, then cache on the external SSD with a measured storage budget. Do not begin a massive full-site simulation as a substitute for art direction.

Use site-appropriate trees and understory from the landscape research: layered crowns, real trunks and branching, leaf silhouettes, canopy gaps, ground litter, exposed soil and restrained moss. Preserve the hero views and natural spatial organization without simply deleting all obstructing woodland. Late-summer foliage must be full and coherent across the site; archive leaf-off photos support geometry, not the selected season. Avoid unsupported autumn colors or out-of-season mass flowering.

Keep repeated assets instanced, use several credible variants and constrained distributions, and preserve real geometry near the route. Farther vegetation may use tested LOD. A model that looks good only because shallow depth of field hides the forest fails the exterior exploration requirement.

## 8. Lighting, color and render profiles

Use one consistent architectural master with two tested profiles:

- **Photo / Cycles:** final photographic stills, settled-view inspection and any later showcase render. Use Metal GPU compute. Do not prescribe CUDA/OptiX, GPU OSL or GPU Path Guiding for this Mac.
- **Explore / EEVEE:** responsive exterior orbit and continuous room traversal. Bake/test room-scale indirect lighting and necessary reflection probes. Preserve the architecture and recognizable materials; document renderer-specific compromises.

EEVEE and converged Cycles are not identical. Do not claim real-time path-traced quality merely because both exist in one file. Reference-match the important views between profiles, especially glass corners, deep interiors, water and reflections as objects leave the screen. [Version-specific technical sources and limitations](research/blender-realism-agent.md).

First establish a neutral reference/diagnostic setup to validate material response and geometry. Then create a beautiful late-summer presentation: coherent sky and sun, believable forest occlusion, luminous terrace edges, deep but readable overhangs and rooms, warm actual interior fixtures, and restrained reflections from water/ground. Favor a carefully balanced photographic scene over theatrical orange grading or uniform fill lights.

Derive direction and shadows from the registered site orientation and a documented sun/sky scenario. Use an unclipped HDR environment or the tested 5.1 sky model; avoid double-counting the sun. The 5.1 sky/property names differ from older tutorials, so inspect RNA rather than hard-coding old enums. EEVEE may require an explicit matching Sun even when a Cycles sky provides sun-disc lighting.

Fix the working color space early, using a documented interoperable baseline such as Linear Rec.709. Begin with AgX and explicit exposure/white balance/look. Distinguish working space from display transform. Save scene-linear EXR masters where useful and inspect the delivered SDR images as sRGB, rather than relying on a wide-gamut display to make oversaturated output look attractive.

Use samples/adaptive noise thresholds as tested starting points, not magic quality guarantees. The technical note suggests preview 64–128 samples and final trials in the 512–2048 range according to convergence. Verify denoising against undenoised crops so it does not erase stone, wood grain, mullions, foliage or fabric. Test transmission/transparent bounce limits using deep multi-pane views. Fix bad geometry/materials before clamping away water/glass highlights.

Benchmark four representative cases before expensive output: hero exterior, deepest interior, glass/material close-up, and water/vegetation. Record device, resolution, memory, preparation time, total frame time and disk cost. Re-bake probes after relevant changes. Add detail according to visible contribution and measured performance, not arbitrary global polygon/sample targets.

## 9. A usable exterior and interior exploration experience

Deliver a native Blender **Explore** workspace opening at an intentional exterior viewpoint, in the correct rendered profile, with presentation overlays/gizmos hidden. Provide a small obvious Fallingwater panel or equivalent controls for:

1. **Exterior overview/orbit** and **return home**.
2. **Start free flight**, with mouse look and familiar movement keys.
3. **Room/terrace bookmarks**, named in plain language and mapped to the source room IDs.
4. **Explore / Photo quality** selection, with clear expectations that Photo can take time to converge.
5. A concise, visible control legend and a reliable way to release navigation and return to editing.

Native Blender Fly/Walk may implement movement if it passes actual testing. Verify the installed keymap, mouse-look, vertical movement, speed/precision controls, start/reset and Escape behavior; do not just copy an old shortcut list. A reasonable starting eye height is around 1.6 m, adjustable for the actual low architecture. No numpad should be required for basic use.

The normal **Start exploring** action must also start/resume the intended water animation. Native Fly/Walk alone does not advance the timeline. Verify moving water while the user is freely navigating, and verify the same behavior after a fresh reopen; do not require a hidden console command or a separate undocumented playback step. Keep animation updates on the supported Blender execution path.

Free flight must allow continuous six-degree-of-freedom exploration, including exterior to interior through genuine openings. Provide slow movement for tight rooms and faster travel outside. If adding a walking/collision mode, test a volume/capsule against doors, stairs, headroom and furniture; a single camera ray is not robust collision. Keep explicit free flight available and do not alter the building to hide collision problems.

Maintain independent cameras for source matching, user exploration and still output. Room bookmarks must place the user in clear space facing meaningful content. Reaching a doorway must not reveal missing ceilings, backfaces or holes. The traversable connection between the main and guest houses must align physically.

A web viewer is **optional** and must not delay or replace the native Blender deliverable. If later requested, derive an optimized glTF/GLB version with separately tested material baking, navigation and collision. Fixed 360° panorama hops or a prerecorded movie alone do not satisfy free flight through actual geometry.

## 10. Adopt useful open-source work selectively

Read the audited Skills.sh/GitHub section in the technical note. It includes timestamped install/star counts and inspected source snapshots. Popularity is a discovery signal, not proof of correctness.

Use the useful archviz/material/QA organization from `arjun988/blender-skills` and multiview/landmark repair practices from `RobLe3/cc-blender-skill`, adapted to this evidence hierarchy. Do not inherit unrelated workflow instructions or bulk install every skill. The audit found stale renderer/export enums and damaging baking/resizing recipes in otherwise popular examples; preserve source materials and validate scripts against installed 5.1.2.

Optional targeted tools: Trimesh for independent mesh checks; fSpy for a camera-match pilot; existing Blosm or BlenderGIS for verified terrain data; Sverchok for a genuinely simpler parametric assembly. Bonsai/IFC or COLMAP become useful only if appropriate source data exists. Keep plain `bpy`/manual measurement fallbacks. Do not use generative image-to-3D or low-poly catalog assets as final substitutes for the documented building or distinctive furnishings.

Record each adopted version/commit/license, its purpose and a small successful test. No dependency merits disrupting the project or degrading fidelity merely to say it was used.

## 11. Build milestones and internal quality gates

These gates are work checks, not requests for user approval. Continue autonomously through them, repair failures, and keep the current status in `STATUS.md`. The user has asked for sustained execution and QA.

| Stage | Work | Evidence needed to advance |
|---|---|---|
| A. Evidence lock and preflight | Read/inspect archive, expand rooms, establish era/conflicts, verify control/storage, calibrate plans and cross-building datum | Room/source/dimension ledgers; environment record; no unresolved gross geometry contradiction |
| B. Entire architectural shell | Trace every floor, façade, terrace, connection, service space, roof and major site rock/stream form | Orthographic overlays and multi-view clay renders; correct routes/scale; all spaces represented |
| C. Representative finished slice | Fully detail a living/hearth/window/terrace area with adjacent masonry and water/landscape context | One exterior, interior and close-up pass in both engines; no blobs, wrong scale or fake glass; initial performance record |
| D. Full interior/exterior completion | Apply proven craft to every room and façade, all observed furniture/fixtures, landscape and water | Every room's implementation complete; inferred details separately labeled with reasons/confidence; no hidden proxy rooms |
| E. Lighting and exploration | Final light balance, color management, probes, controls, bookmarks, performance work | Full connected interactive traversal, all controls tested, renderer comparisons, measured timing |
| F. Independent visual review and repair | Compare against sources, inspect contact sheets/crops, record and fix defects | All critical/major defects resolved and affected views rechecked; final QA report |
| G. Packaging and clean reopen | Portable `.blend`/assets/scripts, stills, launch/control guide and known limitations | Fresh-process reopen from delivery location; missing-file scan clean; navigation works; all delivered links/files verified |

User-authorized agents may independently review architecture, interiors, materials and QA images. Give them bounded assignments and source access. The coordinator owns integration and the one live scene writer. A reviewer should name concrete defects and source discrepancies, not merely score whether the scene feels impressive.

## 12. Acceptance tests and definition of done

The numeric targets below are project checks, **not claims of professional survey accuracy or universal photorealism**. Record actual results and uncertainty. Do not silently relax a target to declare completion.

### Fidelity and geometry

- Every inventory item has a model/review state; **zero silently omitted rooms or unexplained final proxies**.
- Explicit source dimensions reproduce their transcribed values within **5 mm or 0.1%, whichever is larger**, unless source uncertainty is greater. This measures digital transcription, not the real building's current accuracy. Raster-derived values retain their own calibration uncertainty.
- Save orthographic overlays for every main/guest floor, the four main façades, available guest façades and coordinated sections. Check heights, cantilever extents, wall/opening positions and stair relationships.
- Register at least **eight independent exterior reference views**, covering classic southwest, east bridge/entry, north/rear, west glazing/masonry, roof/terrace relationships and guest canopy/pool. Do not distort geometry to match one lens. For unambiguous structural landmarks aim for median reprojection error ≤1% of image diagonal, reporting exceptions and lens uncertainty.
- Check evaluated geometry for accidental holes, inverted architectural normals, floating furnishings, z-fighting, broken booleans, wrong material assignments and unintended intersections. Apply watertightness checks to intended solids, not indiscriminately to leaves/open environmental meshes.

### Visual quality

- Inspect each exterior direction, terrace underside, roof, entry/bridge, rock junction, waterfall and pool.
- For **every enclosed room**, capture at least doorway-in and reverse views, plus enough additional views to inspect every boundary and focal object. Closets/service spaces may use compact inspections; they may not go unchecked. Use a 360° interactive look as a complement to stills.
- Review final-size images and 100% crops of stone joints, concrete edge highlights, wood grain/edges, glass corners, furnishings, lamps, fabrics, foliage and water. Reject obvious tiling, plastic response, overblown displacement, faceting where inappropriate, denoising smears and repeated identical plant silhouettes.
- Compare neutral and presentation lighting. Reject unexplained light leaks, clipped architectural detail, uniform room illumination, black/opaque glass failures and excessive grading or blur used to disguise modeling problems.
- Every defect has an ID, room/object, camera/reference, severity, corrective action and recheck image. **Zero unresolved critical or major defects** at delivery. Minor residual limitations must be specific and disclosed.

### Interaction and performance

- Traverse exterior → entry → all main rooms/terraces/levels → connecting bridge/walkway → guest rooms/pool → upper staff spaces, and separately inspect the service basements. Test difficult doors/stairs in both directions.
- Test orbit, look, free-flight movement, vertical travel, speeds, every bookmark, release/Escape, return home and profile switching on the saved file. No forced wall-crossing to access a room; free flight may intentionally pass through geometry when the user chooses.
- Review actual continuous motion for water-loop seams, foliage shimmer, shadow/reflection pops, light-probe leakage and exposure transitions. Attractive selected stills are insufficient.
- Initial Explore target on this Mac: **at least 30 FPS median at a documented 1920×1080 viewport, with 95th-percentile frame time ≤50 ms** after warm-up on representative routes. Measure actual presented/rendered frames with a suitable method; timeline playback rate or a Python callback frequency alone is not proof. If profiling requires another tool, state how it measures the result. Optimize instancing/LOD/probes/textures first; report genuine limitations instead of quietly compromising the house.
- Native 4K is a quality aspiration, not an unmeasured real-time promise. Preserve full-quality Cycles output while optimizing the Explore derivative.

### Final outputs

1. **Editable Blender master** with complete scene, named collections, intact materials and references to required assets.
2. **Working Explore experience**, intentional start view, room bookmarks and local launcher/control guide.
3. **Final photographic stills**: at minimum classic waterfall exterior, alternate exterior/entry, guest-house/pool context, living/hearth, one adult suite, third-floor study and one material close-up. Render selected hero images at **3840×2160 or equivalent approximately 4K framing**; use source-appropriate compositions without extreme wide-angle distortion.
4. **Comprehensive QA evidence**, including every-room review imagery, plan/elevation overlays, source-match images, route/control results, measured performance and defect resolution.
5. **Reproducible source/data and documentation**: stage scripts, parameter and room/source ledgers, dependency/asset manifest, `STATUS.md`, `QA_REPORT.md`, `KNOWN_LIMITATIONS.md`, `HOW_TO_EXPLORE.md` and workspace `DELIVERY.md` with verified absolute paths.
6. **Fresh-process delivery check** from the actual final directory, confirming no missing linked images/libraries/caches, correct startup presentation and working navigation.

A polished prerecorded flythrough may be an additional output after core completion, but is not required to replace user-controlled movement. If produced, test a low-cost motion preview before rendering a resumable sequence; do not commit to a long 4K film without measuring cost and storage.

### Completion discipline

Do not claim “exact to every detail,” “scan accurate,” “photorealistic at every viewpoint” or “fully QA'd” beyond actual evidence. The public archive leaves some concealed/current service details unresolved. Document those honestly while delivering the strongest coherent reconstruction possible.

Do not stop because the work is extensive, a first render looks plausible, a nominal sample count was reached, or an add-on failed. Inspect, compare, repair and preserve progress. If genuinely blocked on an inaccessible essential input, isolate the gap, continue independent work, and state precisely what cannot be verified. The final response must identify real delivered files, actual tested behavior and material remaining limitations. Only mark an execution goal complete when all required work and verification are finished.
I did not write this prompt. I riffed at Astra for about a minute, told it to research first and produce a PRD, and this is what came back. It is 37,000 characters.
The research pass alone pulled 15 measured drawing sheets and 49 interior and exterior photographs from the Library of Congress. That is the reason this works. A photograph tells a model what a house looks like. A measured drawing tells it the living space is 48 feet by 33 feet 8 inches.
Most of the document's length goes on removing choices before the model can make them badly: which source wins when two disagree, which photographs to exclude, which datum each building measures from.
Fallingwater: what it did on its own
It ran for one day, five hours, eleven minutes and three seconds, without stopping, on the $200-a-month plan. I never hit a usage limit.
The things it did unprompted are the story. It used computer vision on its own screen to check its work, catching things like a furniture mismatch in the guest room where the model had an upholstered seat and the reference had a writing desk and chair. It went and looked up photographs of Canadian hemlock so the trees outside would be the right species. It found a photographer's Fallingwater interior shots that were not in its own research pack, decided the pack was incomplete, and pulled them in.
It also cheated, and said so by doing it. It pulled assets from Poly Haven rather than modelling every object from scratch. It did not ask permission; it worked out that the shot needed them.
The finished scene holds 5,755 objects across 27 rooms, from the wine cellar up to the third-floor study. A fresh Blender process reopened the file, registered the controls, and found all 49 external image paths present.
Where Fallingwater falls short
Watch the tour and you can see it. These are the defects I would tell you to expect if you run this yourself.
Rendering artifacts. Grainy speckle through several shots and a visible flicker between frames. My RAM was getting hammered, so the viewport playback was glitchy on top of that.
Water. The waterfall does not read as water. It is the least convincing surface in the build.
It degrades toward the end. The first rooms are excellent. The last ones are sparse, with blown-out highlights and much less detail, because I told it to wrap up. Left alone it would still be going.
Camera work. The tour cuts between rooms and some angles are odd. It does not walk one continuous route, and the lower stair still reports nine wall contacts up to 42 mm.
Frame rate. The brief asked for 30 FPS at 1080p. Measured performance ran 6.7 FPS with water animating to 30 FPS with it paused. It missed the gate.
The project's defect register has 45 entries and four are resolved. The agent wrote its own KNOWN_LIMITATIONS.md saying the acceptance gates were not met, which is more useful than a build that claims to be finished.
Who would actually pay for this
However cool that is, the fair question is whether it is useful. Real estate, architecture, construction, interior design and developers are the obvious ones. If you are in any of those, or sell into them, this is a client deliverable.
The version I would actually run: go to Zillow, find homes listed for sale, contact the broker or developer, and offer them a 3D render of the property for a few hundred dollars. People pay thousands for this. You can undercut everyone because Astra is doing the work, and you can do it at volume, because broker emails are right there on the listing. Point Astra at the listing photos and tell it to recreate them in Blender.
That is a riff, not a business plan. The point is that the output is a thing somebody already buys.
Build two: my own studio
# Recreate a real room in Blender

A reusable prompt for turning a room video, photographs, and measurements into a detailed Blender reconstruction. Replace the bracketed fields with your own information. You can start with the video and provide measurements as you go.

---

I want you to recreate my **[room type: office, studio, living room, etc.]** in Blender using the video and photographs I provide.

The video may move around irregularly, revisit the same areas, and show different objects from different angles. Use those overlapping views to understand how the entire space fits together.

My goal is a measured, editable model with photographic realism. At first glance, a finished render should look like a photograph of this particular room. Match the actual furniture, finishes, flooring, rugs, plants, equipment, and lighting—not just the general style.

## My inputs

- Reference video and photographs: **[attach files or identify the project folder]**
- Room length, width, and ceiling height: **[measurements, or “to follow”]**
- Window, door, and recess measurements: **[measurements, or “to follow”]**
- Furniture measurements or exact product references: **[optional]**
- Presentation: **[exactly as photographed / keep the furnishings and remove temporary clutter]**
- Lighting: **[match the references / describe a different lighting setup]**

## First, research the space

Start with a research pass. Do not begin constructing the room yet.

Extract useful video frames and assemble contact sheets with timestamps. Include wide views of each wall, connecting corners, floor and ceiling views, and closer views of important furniture and materials. Keep the original reference files intact.

Check whether the footage covers the whole room. Tell me specifically what is missing or obscured. Ask for targeted additional photographs when they would resolve a gap; do not automatically request another complete room tour.

Use the overlapping views to establish the layout. Do not force a seamless panorama if camera movement would distort the relationships between nearby furniture and distant walls.

Create an inventory of the room's architecture, furnishings, fixtures, and visible materials. Separate what you can observe from what you are estimating. Do not treat an assumed furniture brand, standard door size, or ceiling tile size as a confirmed measurement.

Account for camera perspective, wide-angle distortion, and exposure differences. If the source is HDR, make consistently converted viewing copies before judging colors and lighting. Do not mistake the camera's processing for the material's true color.

Write a PRD and build plan containing:

1. The intended result and scope.
2. The reference inventory and coverage gaps.
3. Confirmed measurements, estimates, and unresolved questions.
4. The furniture and material inventory.
5. The modeling, lighting, and camera-matching approach.
6. The build stages, review criteria, and final deliverables.

Finish this first phase by showing me the contact sheets, the plan, and the most useful next measurements. Wait for me to start the reconstruction phase.

## Keep measurements consistent

Use one coordinate system and a consistent real-world scale. Preserve my original measurement units alongside any conversions.

Clarify where each measurement starts and ends. Distinguish the main wall face from a window recess, the opening from its trim, and the finished floor from the top of a rug. Do not add the same recess or trim depth twice.

Record unknown values as unknown. A precise-looking number is not useful if it was invented. Use measured geometry and multiple reference views together rather than stretching the room to fit a single photograph.

## When I ask you to build

Create a dedicated Blender project with separate files and checkpoints. If another Blender project is running, use an isolated process and verify the target file before making changes. Do not overwrite, close, or redirect an unrelated session.

Evaluate the available Blender MCP tools and Blender Python workflow. Choose the appropriate control method for each operation; neither replaces careful modeling or visual verification. Check which instance an MCP connection controls before using it.

Build and verify the measured room envelope first: walls, floor, ceiling, openings, recesses, trim, and major furniture positions. Then finish one representative area to establish the required material and lighting quality before applying that approach throughout the room.

The finished scene must include recognizable, detailed objects. Model the features that affect shape and shadows: furniture legs and supports, cushion seams, cabinet gaps, handles, rug edges, window frames, and plant leaves. Use subtle, correctly scaled surface detail for wood grain, fabric, paint, and other finishes.

No final placeholder furniture, swollen cushions, featureless plant blobs, or generic textures that erase the room's identity. Do not hide unfinished modeling behind heavy blur, dramatic grading, or a single favorable camera angle.

Reproduce the observed light sources, their direction, relative brightness, color, and shadow softness. Keep material color separate from colored light falling on it. Use Cycles for the final photographic renders, with quality settings chosen through inspected results rather than an arbitrary sample count.

If I requested a tidied room, record what was removed. Preserve working equipment and plausible cable connections. Do not silently redesign the room or replace its furniture.

## Verify and deliver

Compare renders with reference frames using matched camera angles. Inspect every wall direction and important close-up. Check dimensions, furniture placement, floor contacts, reflections, material scale, and lighting.

Review the actual rendered images, repair visible discrepancies, and reopen the saved project to verify that it works and its assets are available.

Deliver an editable Blender file, dimensioned room drawings, photographic stills from several useful viewpoints, and a brief account of remaining uncertainty. Keep reference comparisons separate from presentation images where deliberate cleanup changes the scene.

Aim for photographic fidelity without claiming that a handheld video establishes exact hidden geometry or guarantees literal pixel-for-pixel identity.

## Handle references privately

Do not publish the project or send private reference media to an additional external service without my instruction. For outputs intended for public sharing, flag visible personal information and use neutral replacements for sensitive screen content, documents, or labels. Keep private reference files separate from the shareable deliverables.

---

**Sharing note:** This template does not require sharing your source footage, exact room measurements, or project files publicly. If you choose to share your own media, review both visible content and embedded metadata, including location information.
This one is relevant to more people, because everyone has a room they work in. I shot a blurry 360 video of my studio on my phone, took the measurements, and handed over both.
I hit my usage limit halfway through this build. It is the only one of the three where that happened, and it is worth knowing before you start: a long Blender run can outlast your plan's window.
Astra noticed the video was HDR and washed out, and made properly tone-mapped reference frames before judging any colours. Then it built a contact sheet out of video stills to get a sense of the space. It asked whether to keep the clutter — boxes, cables, water jugs — and I told it to remove the temporary stuff.
The first pass was blobby and cartoonish and I said so. It asked what keyboard, mouse and Stream Deck I use; I told it to look at the video and identify the actual products, and to look up product photos where the video was too grainy. That is the single most useful instruction in this whole post.
At three hours and thirty-seven minutes it was giving itself notes like "moving the console about 11cm forward improves all three lounge views while keeping it grounded."
The detail it reached from a low-res phone video is the part I did not expect. The coffee maker. The disinfectant wipes. My Cafe Garibay coffee. The teleprompter, the bamboo, the Google Home, the Polaroid, the 3D camera on the floor. The book on the shelf is Ogilvy on Advertising, and it read the spine. It modelled the mesh of the chair. It even mocked up what was on my monitor at the time.
The console is where it spent its time and it shows. Set the render next to the real thing and it is nearly identical. Other surfaces stay boxy, because I had it rush them.
It also produced measured drawings, which I did not ask for. Orthographic projections straight off the geometry, dimensioned in metric and feet-inches, each dimension labelled either measured or estimated. That distinction is what makes them usable: it tells you which numbers you can drill to.
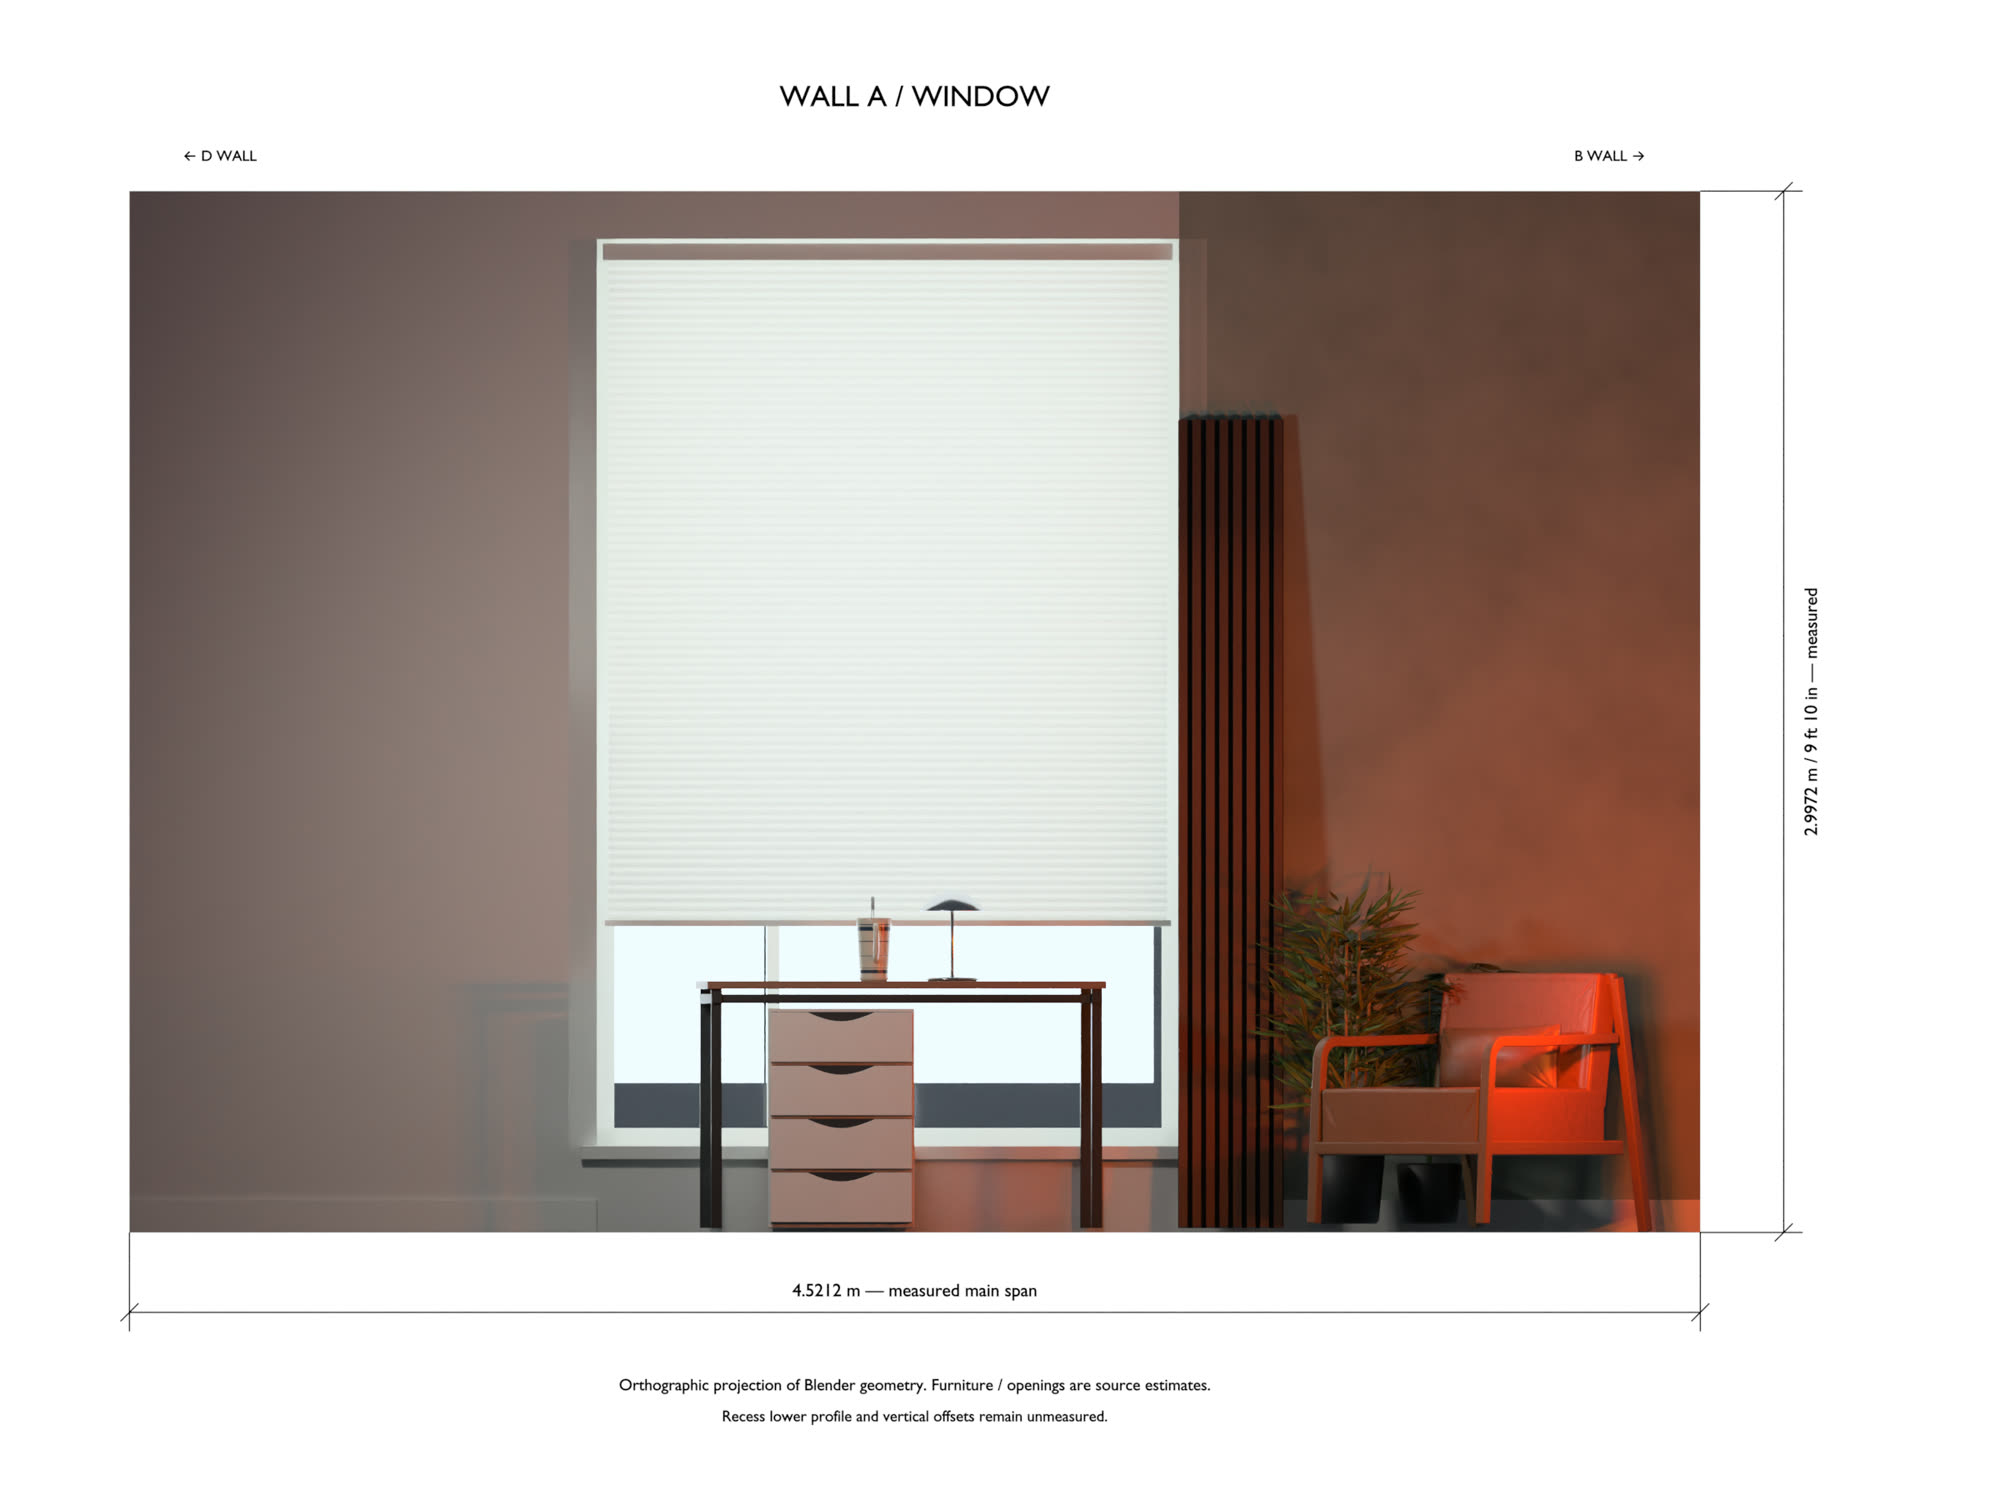
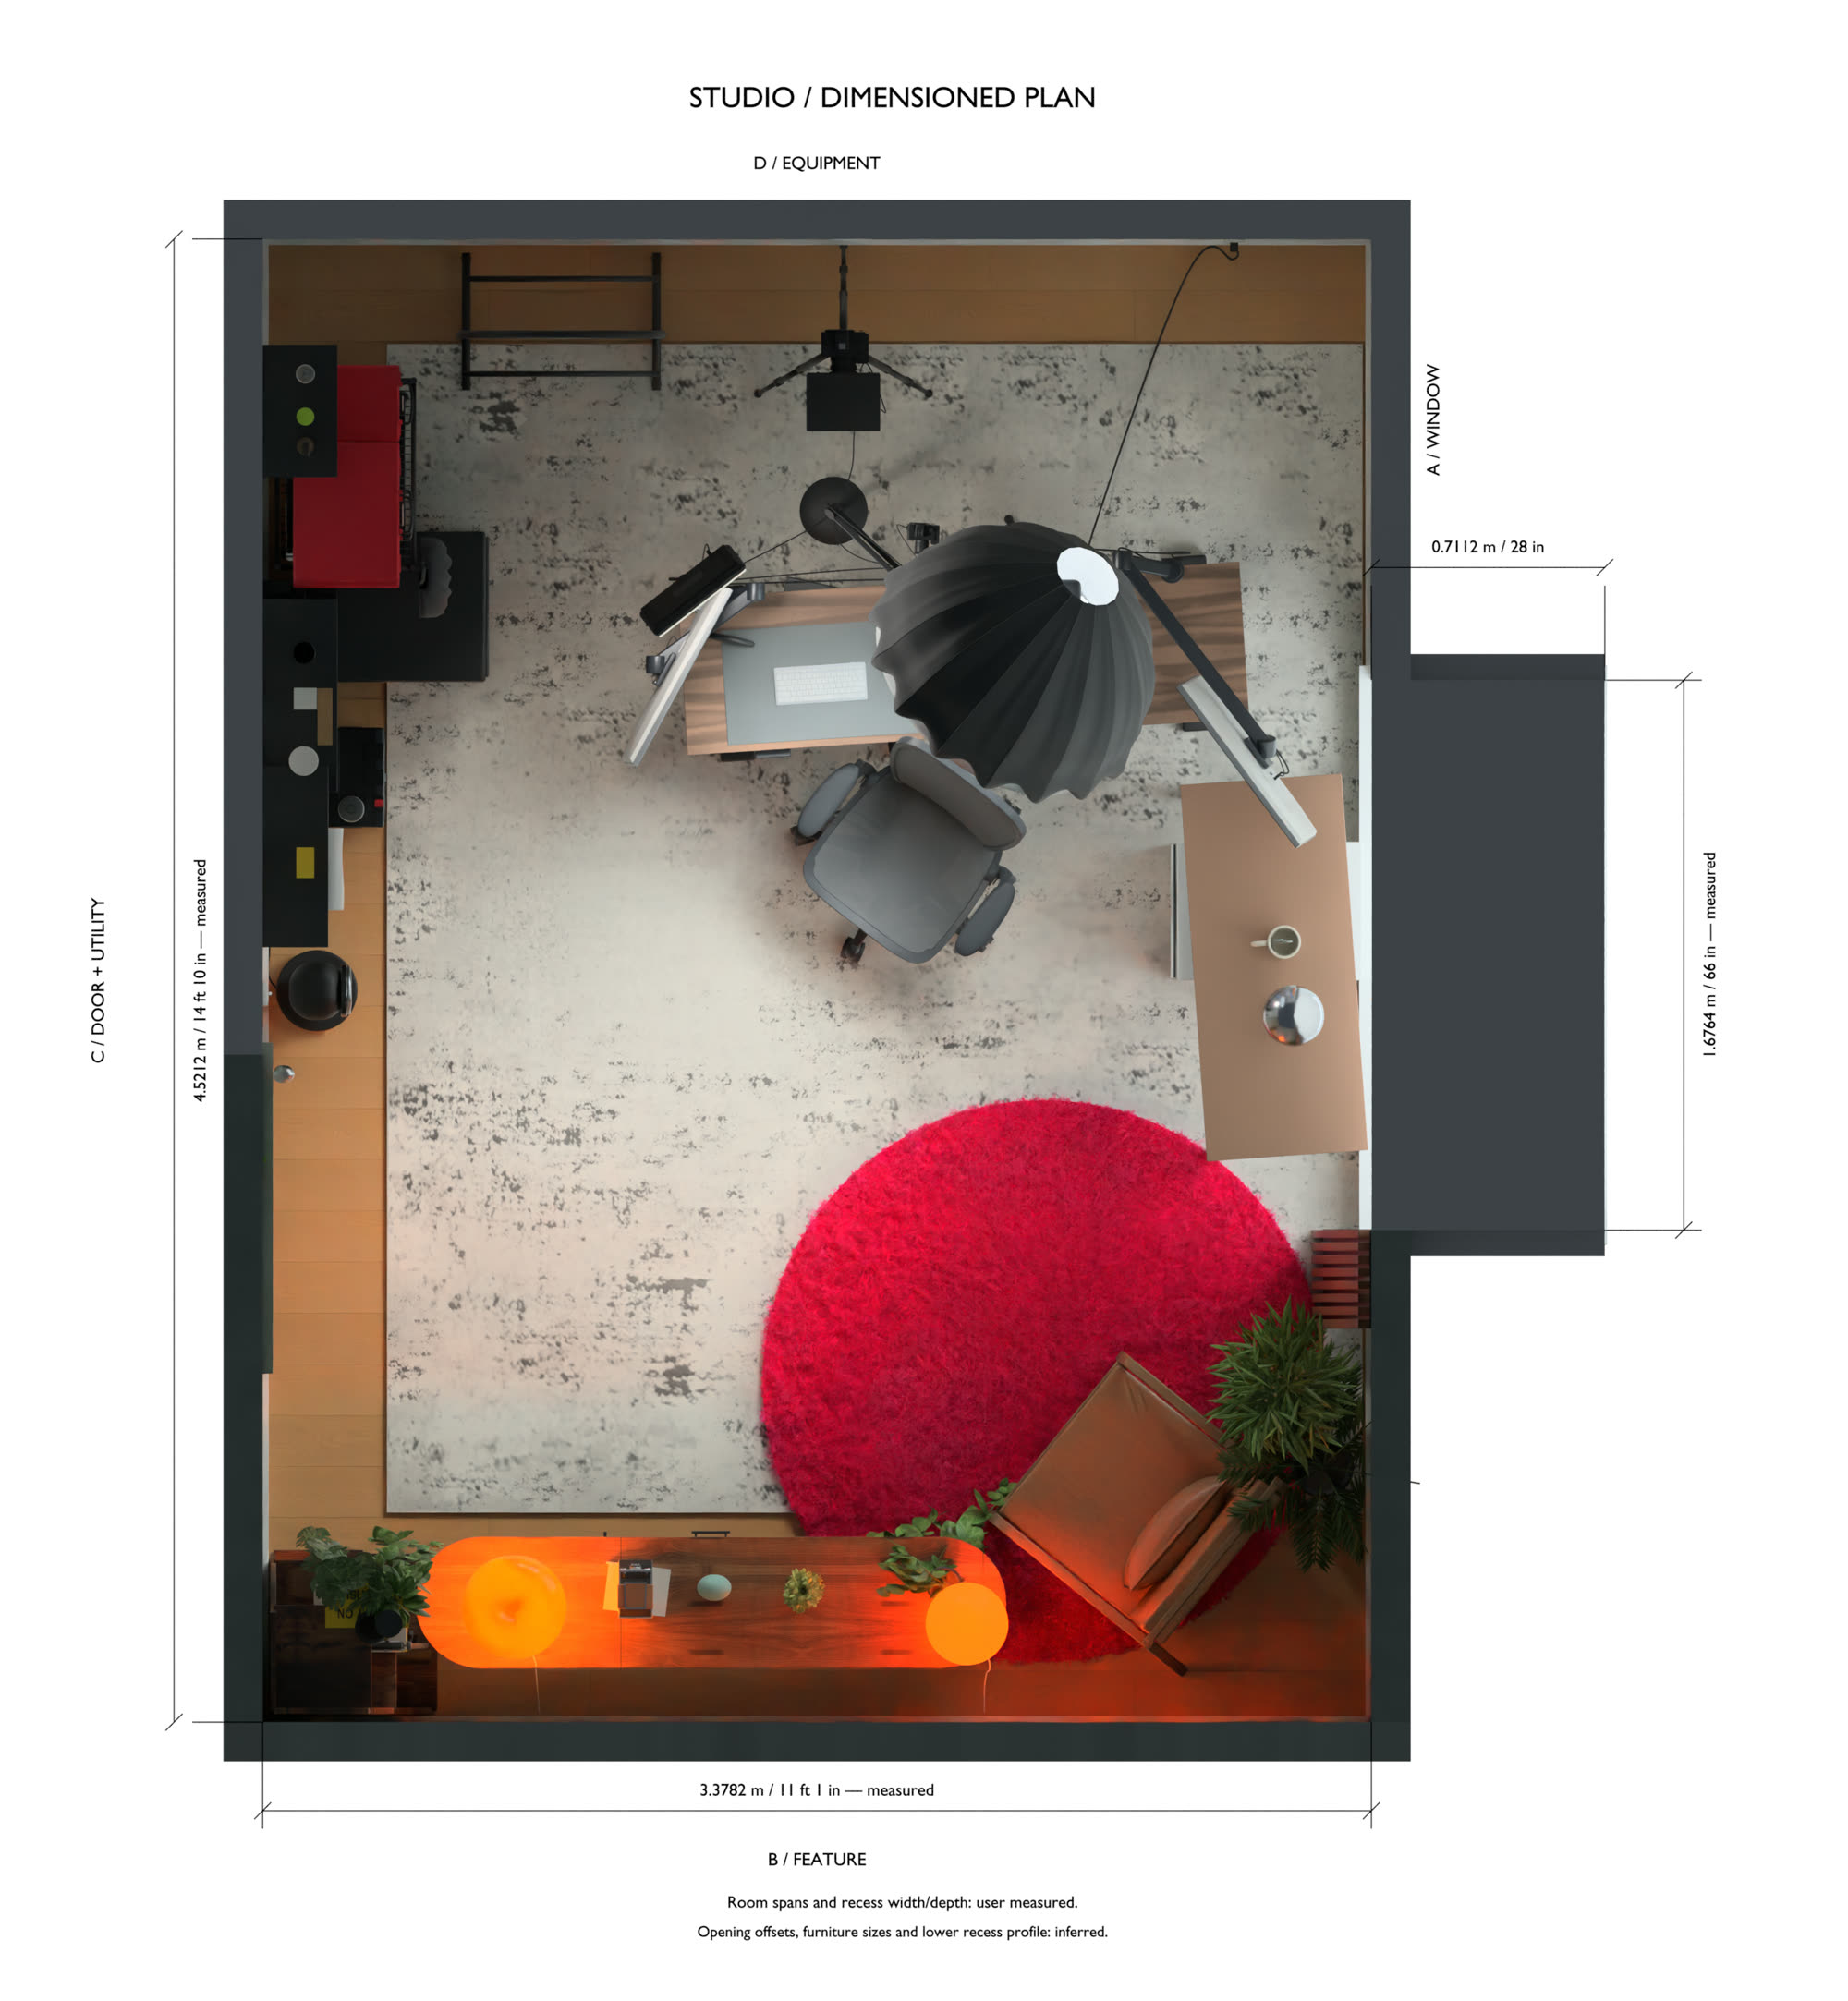
The full set is at pat-studio-astra.vercel.app.
The reason I built it: I want to hang floating shelves and lights on the back wall, and I can now ask what they look like from my actual camera position before I drill anything.
Build three: a robot on a web page
# Build a premium 3D NEO robot experience

Act as a product designer, reference researcher, Blender artist, and frontend engineer. Create a faithful, premium redesign study of the official 1X NEO page: https://www.1x.tech/neo. Treat this as a client-style design exercise. The central improvement is a complete, interactive 3D robot in a softly lit studio, followed by an engaging scroll experience using the brand's existing visual language and real product footage.

Build the robot first and show me the actual 3D result before integrating the marketing website.

## Available references and setup

If the accompanying NEO starter kit is present, read `README.md`, open `REFERENCE_INDEX.html`, and inspect `research/ROBOT.md`, `research/BRAND.md`, `research/BLENDER.md`, `assets/manifest.json`, and `assets/video-manifest.json`. All paths are relative to the extracted kit. The images, screenshots, and video frames are references from the official website; they are not generated robot renders. Keep them intact and write your new work to separate folders.

This project must work without access to the creator's computer, earlier projects, generated models, renders, special skills, or paid generation services. Inspect the tools actually available. Use Blender's Python API (`bpy`) for reproducible modeling, rendering, and export. Use a Blender MCP connection for live inspection if available; otherwise use an isolated Blender process and saved Python scripts. If Blender is missing, finish the research and PRD, then explain the specific installation needed. Never present a reference photograph as the 3D deliverable.

If the kit is missing, start from the official product and order pages, https://www.1x.tech/neo and https://www.1x.tech/order. Collect your own references from those pages and their linked official sources. Do not assume that a file named in this prompt exists. Record original URLs and retrieval dates. Public source URLs can change. Do not use similarly named domains as substitutes for 1X.

## Phase 1 — Research and PRD

Inspect the full official page on desktop and mobile. Study the logo, navigation and its scroll states, typography, spacing, rounded media panels, glass play controls, CTAs, icons, product copy, and closing studio portrait. Inspect pixels as well as DOM/CSS. Distinguish measured source details from proposed changes.

Build a multi-view robot reference board covering the face, profile, full body, shoulders, textile construction, hands, shoes, ear rings, and any usable rear views. Compare the Tan, Gray, and Dark Brown order images, targeting the Tan campaign exterior. Use video frames to resolve details. Do not mix exposed engineering hand imagery with the finished campaign appearance without explaining why.

Write `PRD.md` with the intended experience, model deliverables, source inventory, interaction plan, implementation approach, milestone acceptance criteria, performance targets, and remaining uncertainty. Make practical implementation decisions and continue into the robot milestone.

## Phase 2 — Complete robot and studio

Create a source-faithful, fully three-dimensional Tan NEO in Blender. The primary silhouette reference in the kit is `assets/images/order-neo-body-96a45b2e.webp`; the face is `assets/images/order-neo-face-c9e24d8e.webp`; the profile is `assets/images/order-neo-cc3c7adf.webp`; the shoe reference is `assets/images/order-neos-boots-192c3ddc.webp`. The intended studio mood is `assets/images/neo-gamma-2102d301.webp`, the closing image from the product page. Its old CMS label is not a reliable product-generation identifier.

Match the elongated soft head, two physical camera lenses and bezels, oval illuminated ear perimeters, neck separation, shoulders, torso and pelvis proportions, diagonal chest/abdomen textile regions, ribbing, seams, cuffs, articulated five-finger hands, ankle hems, and knit shoes with distinct soles. Use the published height, approximately 1.6764 metres, for overall scale; document other dimensions as estimates. Match large shapes before spending time on fine texture.

Model the back, sides, underside, palms, feet, and gaps between limbs. Reference coverage is incomplete: there is no validated clean rear campaign view in the supplied set. Some introduction-film frames that appear useful at first are actually front views. Inspect every claimed view. Document inferred geometry and keep it visually plausible. Avoid invented sci-fi details.

Use a neutral studio with broad soft light, restrained highlights, a gentle floor shadow, and a quiet pale background. Recreate the closing portrait's lower-body opacity fade in presentation while keeping the underlying model complete. Provide a separate inspection view with the fade disabled. The original fade is embedded in the source image's alpha channel.

Maintain an editable Blender master and a reproducible script workflow. Keep source observations separate from modeling estimates. Fit and compare front, side, and three-quarter silhouettes under simple shading before refining fabric, lenses, lights, and materials. Review actual renders and correct visible errors; an inventory of modeled parts is not evidence of likeness.

Export a GLB that preserves the intended appearance in a browser. Bake unsupported procedural material effects into portable PBR maps as needed. Check normals, UVs, texture color spaces, scale, transparency, and material roughness after export. Reopen the saved Blender file in a fresh process and inspect the exported GLB independently.

Present the editable `.blend`, the `.glb`, a freely rotatable browser viewer, a complete 360-degree orbit, and front/profile/back/three-quarter comparison images. Include a concise uncertainty and remaining-quality report. A photograph, generated illustration, billboard, image sequence, or generic primitive mannequin does not satisfy this milestone. Pause for my review here before marketing-page integration.

## Phase 3 — Website after model review

Use the approved robot as the first thing visitors see. Preserve 1X's quiet, warm, premium tone. The September 2026 reference measurements are a starting point: page `#f7f7f7`, ink `rgba(0,0,0,.72)`, dark logo `#41403c`, media corners 80px desktop / 48px mobile, pill buttons, and glass controls using white at 16% opacity with 24px backdrop blur. Major headings are approximately 56px desktop / 30px mobile; body text 24px / 16px. Refer to `assets/brand/tokens.json` and the screenshots for context rather than imposing fixed widths on every screen.

Use the original SVG logo and icons from the kit. The source font is ABC Diatype. Font binaries are not included: use a properly licensed copy if supplied, or a clean system sans fallback and state that substitution. Rebuild clean components; do not ship captured analytics or copy the original app's hidden markup.

Design a scroll-controlled studio sequence with a smooth complete robot rotation and a few deliberate pauses or camera moves for the face, hands, textile, and feet. Start with one sticky canvas and a normalized scroll timeline; roughly four viewport heights is a candidate desktop length, to be tuned in the browser. Keep native scrolling and avoid trapping the user. The first frame must already look composed and intentional.

Transition into large, rounded panels showing original product demonstrations, with restrained feature callouts, accessible glass playback controls, and purposeful connections between the robot and footage. Source video links and observations are in `assets/video-manifest.json`; do not assume local MP4 files are supplied. Use native HLS where supported, a compatible player where necessary, or a verified local derivative with provenance. Preserve captions and review crops on mobile. Start playback muted when automatic; provide pause, mute, and explicit play controls.

Call out only supported product features. Treat performance and capability claims as manufacturer statements. Clearly distinguish expert-assisted operation from autonomous behavior; a demonstration clip alone does not prove autonomy. Recheck time-sensitive specifications, pricing, availability, and order links before writing them into the page.

React, TypeScript, Three.js / React Three Fiber, and GSAP ScrollTrigger are a reasonable default, but adapt to the existing project. Keep one renderer, resize it correctly, pause work offscreen, and use a responsive render budget. Aim for a compressed model around 8 MB on desktop and 4 MB on mobile if achievable without sacrificing likeness. These are targets to measure, not promises. Lazy-load video and secondary media.

Provide keyboard-accessible navigation and media controls, visible focus states, sufficient contrast, and a useful `prefers-reduced-motion` mode. Include a matching loading poster, a clear load-error fallback, touch-friendly model inspection, and a mobile experience that remains useful without long pinned motion. Use official outbound order links; this prototype does not need payment collection.

## Delivery and verification

Deliver the research/PRD, editable model, modeling scripts, browser export, inspection viewer, final website source, and concise run instructions. Keep references, generated work, and optimized runtime assets in separate folders. Track source URLs and inference notes. This educational reference kit does not confer a commercial media or font license; obtain appropriate assets and permissions for a production release.

Verify the saved master, exported model, full rotation, resemblance from multiple angles, desktop/mobile layout, playback, links, keyboard use, reduced motion, and actual loading behavior. Report what was tested and any remaining limitations honestly. Deliver a working local project; publish the finished redesign only if I ask.
The last build is for anyone with a website. A real 3D object on a page is one of the fastest ways to make a site read premium, and it is where web design is going.
I pointed Astra at the 1X NEO product page — a $20,000 home robot — and asked it to extract the branding, the logo, the rounded corners, the glassmorphism CTAs, the icons, then build a 3D model of the robot and make it the hero. Research agent, PRD, fresh build agent, same as the others.
It ran twenty hours and twenty-two minutes overnight and produced 69 iterations. The revision history runs 2:22am, 3am, 4am, 4:43am, revision 50, and on until the afternoon. Twenty hours is hard to justify for one object when Fallingwater was an entire house room by room.
The model itself is very good. The mesh, the texture, the shoes, the face, the hands built from separate reference photos, the charging port on the back. Zoom in and there is a studio reflection in the surface. The one thing it missed is the shell colour: NEO is cream and the model drifted white, and it was closing the gap when I stopped it.
The page is a build demo, not 1X's site.
What the three cost
Cache reads dominate every row. A long agentic run re-reads its own growing context on every turn, so 1.19 billion of the 1.22 billion input-side tokens are the model reading back what it had already done.
| Build | Wall clock | Input | Cache reads | Output | Cost |
|---|---|---|---|---|---|
| Fallingwater | 1 d 5 h 11 m | 10,314,143 | 465,753,216 | 2,108,208 | $674.31 |
| The studio | 3 h 37 m | 10,559,353 | 443,879,936 | 2,105,972 | $654.77 |
| NEO product page | 21 h 15 m | 7,064,070 | 285,310,592 | 1,731,504 | $442.53 |
| Total | ~54 h | 27,937,566 | 1,194,943,744 | 5,945,684 | $1,771.61 |
These are API-equivalent costs, which means token counts priced at published rates. All three ran on the $200-a-month plan, so no invoice for $1,771.61 exists. Fallingwater and NEO never hit a limit. The studio did, halfway through.
The rate is not constant. Fallingwater burned $674 over 29 hours; the studio spent nearly the same money in three and a half. Cost tracks how hard the model is working, not how long it is left running.